This was my first big wedding of the year and it kicks off back to back weddings; so be looking for another post next weekend :) I was pretty nervous since it's been awhile since I've done a large cake like this and after the last fondant cake "almost fiasco" I was a little nervous about this cake.


Friday night I was able to make 1 1/2 tiers of the cake. And Saturday morning I got up and went to the grocery store for the 2nd time in two days, then again Saturday right before delivery... Lesson #4-Make a list. Yes that is three times in two days, maybe this should be lesson #4&5. But during that morning I baked the other 1 1/2 layers, tinted the fondant and defrosted the icings that were in the refrigerator. Yes, my refrigerator froze my icing and my milk... Lesson #6-Don't overcrowd the refrigerator.
Once the icing was thawed enough to put on the cakes, I went ahead and iced the middle tier since that was the only one completely cooled and that one needed to be covered in fondant.
I always get really nervous when I'm rolling out fondant that I won't have enough. So this time I made plenty! I think this might have been the biggest piece of fondant I've ever rolled out. Lesson #7-I need a sheeter once I open a shop. Rolling out fondant is an arm workout!

I even had some left over from this! And it went on a lot more smoothly than last time! No tears and less crazy edges :) Just a few spots at the corners and those were easily covered with the twigs.
I love the idea that something is carved into a cake and carrying with the rustic feel of this cake, the bride requested no piping but a heart with their initials carved into the fondant.

Up close it looks a little rough in spots but I was able to clean it up a little bit more after this. There are special tools made just for fondant that I would recommend if you are planning on doing anything like this. A toothpick would tear the fondant too easily.
After I finished this tier I felt much more relaxed about the cake, the hard part was behind me! The top and bottom layer were textured buttercream! A baker best dream; if you want to make your baker happy, tell them you want a textured buttercream wedding cake! This one had horizontal "stripes" that I made with the spatula I used to ice the cake. I used a smaller spatula for smaller lines to fit the size of the cake. I kept with the "striped" theme on the tops as well to tie it all together.

Like I said earlier, the tiers were all filled with different things. To keep the filling from smooshing out of the cake and mixing with the buttercream you make a little dam around the bottom tier with buttercream, or whatever type of icing you are using on the outside of the cake. Then add your filling and top it with the second layer of the tier.

Yes, this tier was supposed to have one layer vanilla and one layer chocolate. This is what is now being called the "Oreo Cake" It is filled withe fudge frosting and crushed oreos. But here you can see the "dam of buttercream" and the filling. I've had no problem with this method, and I just make sure there is enough buttercream and try to keep it one long line around and add a little extra bit where the piping meets.
I don't like to stack my cake before I transport it. I didn't have the best luck the only time I did that, and these suckers can get heavy! So I put all the pieces in the back of my car and head out to the venue. Another reason I don't like to stack the cake prior to delivery...I had to park at the end of a gravel lot and the streets were cobblestone! I love Wilmington and it's cobblestone, but I a nice flat surface would have been great for a push cart that I could have loaded it on and made one trip. But it's extra steps :) See and you thought I wasn't talking about health or fitness in these posts... silly you!
The venue was the Riverwalk Landing and it is this cute little building on the water front. Great place to get married! You brides should check them out, and me out! I'm free the next couple of months! :)
Lesson #8- Get used to setting up cakes with an audience. Set-up went great and quick but I need to learn lesson #8.

Here you can kinda see how my little birds were a little too fat for the cake. But easy fix with the spatula, and another great thing about textured cakes!

I just stuck twigs in where ever I could get them to stay and I was able to use the buttercream as an anchor for some then pile them around, stick them under, behind, you like a birds nest ;)

This was Lesson #9- make sure the flowers are done way in advance! The stems may of may not have a little floppy and WAY too long, but never fear, tear them off where they are breaking, stick a toothpick in it and viola, looks better than planned!

The bride made the topper and it was so precious! I loved the theme that she tied together so well with her design.

Hope you enjoyed learning my lessons along with me! I'll keep you up to date on how they're coming. Be sure to check back next weekend for another wedding cake post! That one may include a recipe :)
Until next time! xo
Over the last week I've been working on twigs for this cake. The bride said she wanted each tier to look like it was sitting in a birds nest. So I'm thinking I've got to make a TON of twigs for this three tier cake. I spent two nights rolling out brown fondant, and slicing it to make branches; about 6-7 hours worth of work time. Haha! I used less than I made the first night. Lesson #1 learned- more is not always more. I way over estimated the size of the cake and the space that would be available to make the twigs into a birds nest.

I used my finger nail to make the marks in the twigs like knots on a tree and a toothpick for the first half and then realized "I have a tool to cut the fondant, that would probably work out a whole lot better." Lesson #2 learned -Work smart.
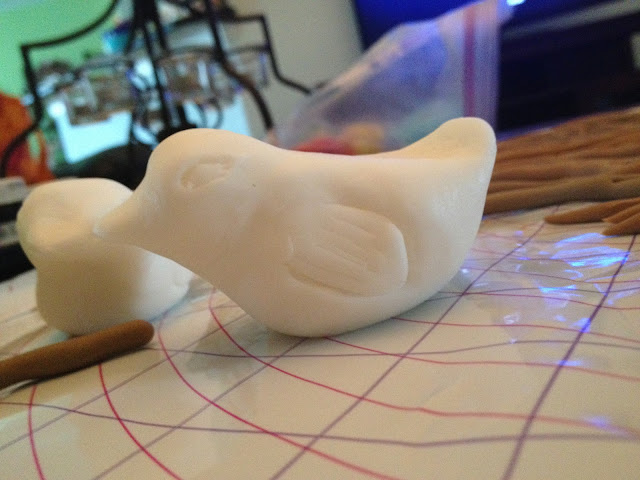
The cake topper is birds nest so to tie that theme throughout the cake, the bride wanted two white fondant birds sitting on the middle tier. I really like sculpting fondant when it is one solid piece of fondant. If there are pieces I have a little harder time keeping it all together. It another thing I want to work on.

I took a toothpick to carve the wing and eyes and made little indentions on the tail to look like feathers. The birds ended up being slightly too big for the cake, but because they were still a little soft I was able to smoosh them a little and used toothpicks to hold them on the cake. Lesson #3 learned- smaller is always better.
Friday I was able to take off at my full time job and got a big head start for Saturday. I fixed all the filling since each of the cakes was a different flavor and had a different filling. And I whipped up 4 batches of vanilla buttercream.

This was full at the beginning of the day. And if you can't tell by the picture, maybe this will help. I used 16 cups of confectioners sugar in just the buttercream! I don't even want to think about the amount of calories in that batch.
Friday night I was able to make 1 1/2 tiers of the cake. And Saturday morning I got up and went to the grocery store for the 2nd time in two days, then again Saturday right before delivery... Lesson #4-Make a list. Yes that is three times in two days, maybe this should be lesson #4&5. But during that morning I baked the other 1 1/2 layers, tinted the fondant and defrosted the icings that were in the refrigerator. Yes, my refrigerator froze my icing and my milk... Lesson #6-Don't overcrowd the refrigerator.
Once the icing was thawed enough to put on the cakes, I went ahead and iced the middle tier since that was the only one completely cooled and that one needed to be covered in fondant.
I always get really nervous when I'm rolling out fondant that I won't have enough. So this time I made plenty! I think this might have been the biggest piece of fondant I've ever rolled out. Lesson #7-I need a sheeter once I open a shop. Rolling out fondant is an arm workout!

I even had some left over from this! And it went on a lot more smoothly than last time! No tears and less crazy edges :) Just a few spots at the corners and those were easily covered with the twigs.
I love the idea that something is carved into a cake and carrying with the rustic feel of this cake, the bride requested no piping but a heart with their initials carved into the fondant.

Up close it looks a little rough in spots but I was able to clean it up a little bit more after this. There are special tools made just for fondant that I would recommend if you are planning on doing anything like this. A toothpick would tear the fondant too easily.
After I finished this tier I felt much more relaxed about the cake, the hard part was behind me! The top and bottom layer were textured buttercream! A baker best dream; if you want to make your baker happy, tell them you want a textured buttercream wedding cake! This one had horizontal "stripes" that I made with the spatula I used to ice the cake. I used a smaller spatula for smaller lines to fit the size of the cake. I kept with the "striped" theme on the tops as well to tie it all together.

Like I said earlier, the tiers were all filled with different things. To keep the filling from smooshing out of the cake and mixing with the buttercream you make a little dam around the bottom tier with buttercream, or whatever type of icing you are using on the outside of the cake. Then add your filling and top it with the second layer of the tier.

Yes, this tier was supposed to have one layer vanilla and one layer chocolate. This is what is now being called the "Oreo Cake" It is filled withe fudge frosting and crushed oreos. But here you can see the "dam of buttercream" and the filling. I've had no problem with this method, and I just make sure there is enough buttercream and try to keep it one long line around and add a little extra bit where the piping meets.
I don't like to stack my cake before I transport it. I didn't have the best luck the only time I did that, and these suckers can get heavy! So I put all the pieces in the back of my car and head out to the venue. Another reason I don't like to stack the cake prior to delivery...I had to park at the end of a gravel lot and the streets were cobblestone! I love Wilmington and it's cobblestone, but I a nice flat surface would have been great for a push cart that I could have loaded it on and made one trip. But it's extra steps :) See and you thought I wasn't talking about health or fitness in these posts... silly you!
The venue was the Riverwalk Landing and it is this cute little building on the water front. Great place to get married! You brides should check them out, and me out! I'm free the next couple of months! :)
Lesson #8- Get used to setting up cakes with an audience. Set-up went great and quick but I need to learn lesson #8.

Here you can kinda see how my little birds were a little too fat for the cake. But easy fix with the spatula, and another great thing about textured cakes!

I just stuck twigs in where ever I could get them to stay and I was able to use the buttercream as an anchor for some then pile them around, stick them under, behind, you like a birds nest ;)

This was Lesson #9- make sure the flowers are done way in advance! The stems may of may not have a little floppy and WAY too long, but never fear, tear them off where they are breaking, stick a toothpick in it and viola, looks better than planned!

The bride made the topper and it was so precious! I loved the theme that she tied together so well with her design.

Hope you enjoyed learning my lessons along with me! I'll keep you up to date on how they're coming. Be sure to check back next weekend for another wedding cake post! That one may include a recipe :)
Until next time! xo
Comments
Post a Comment